

آموزش ساخت تب در اندروید
یکی از ویژگی های برنامه های حرفه ای در اندروید منویی در حالت تب است که می توان با آن ار صفحات بصورت خیلی بهینه استفاده کرد.
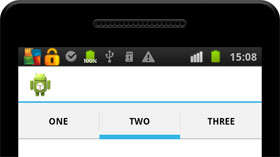

برای ساخت تب در اندروید استادیو از tabhost استفاده می شود.
که با کشیدن و رها کردن آن در صفحه layout ساخته می شود و ترکیب زیر را ذارد.
    <TabHost
        android:layout_width="match_parent"
        android:layout_height="wrap_content"
        android:id="@+id/tabHost"
        android:layout_gravity="center_horizontal"
        android:layout_weight="0.03">

        <LinearLayout
            android:layout_width="match_parent"
            android:layout_height="match_parent"
            android:orientation="vertical">

            <TabWidget
                android:id="@android:id/tabs"
                android:layout_width="match_parent"
                android:layout_height="wrap_content"></TabWidget>

            <FrameLayout
                android:id="@android:id/tabcontent"
                android:layout_width="match_parent"
                android:layout_height="match_parent">

                <LinearLayout
                    android:id="@+id/linearLayout"
                    android:layout_width="match_parent"
                    android:layout_height="match_parent"
                    android:orientation="vertical">
                    <TextView
                        android:layout_width="match_parent"
                        android:layout_height="match_parent"
                        android:text="@string/formul"
                        android:background="@color/menu4"
                        />

                </LinearLayout>

                <LinearLayout
                    android:id="@+id/linearLayout2"
                    android:layout_width="match_parent"
                    android:layout_height="match_parent"
                    android:orientation="vertical">
                    <TextView
                        android:layout_width="match_parent"
                        android:layout_height="match_parent"
                        android:text="@string/aboutapp"
                        android:background="@color/menu4"
                        />
                </LinearLayout>

                <LinearLayout
                    android:id="@+id/linearLayout3"
                    android:layout_width="match_parent"
                    android:layout_height="match_parent"
                    android:orientation="vertical">

                    <TextView
                        android:layout_width="match_parent"
                        android:layout_height="match_parent"
                        android:text="@string/best"
                        android:background="@color/menu4"
                        />
                </LinearLayout>
            </FrameLayout>
        </LinearLayout>
    </TabHost>
توجه داشته باشید شما با linearlayout کار دارید و اجزای صفحات را درون آن می گزارید.
و حالا به سراغ کد آن می رویم که بسیار راحت است.
import android.app.Activity;
import android.os.Bundle;
import android.widget.TabHost;

/**
 * Created by piero on 10/27/16.
 */
public class formul1 extends Activity {

TabHost
    tabHost;
    @Override
    protected void onCreate(Bundle savedInstanceState) {
        // TODO Auto-generated method stub
        super.onCreate(savedInstanceState);
        setContentView(R.layout.formule1);

        //معرفی تب هاست
        tabHost = (TabHost) findViewById(R.id.tabHost);
        tabHost.setup();


//افزودن تب ۱
        TabHost.TabSpec spec1=tabHost.newTabSpec("TAB 1");
        spec1.setContent(R.id.linearLayout);
        spec1.setIndicator("Appinapps");

//افزودن تب ۲

        TabHost.TabSpec spec2=tabHost.newTabSpec("TAB 2");
        spec2.setContent(R.id.linearLayout2);
        spec2.setIndicator("google");

//افزودن تب ۳
        TabHost.TabSpec spec3=tabHost.newTabSpec("TAB 3");
        spec3.setContent(R.id.linearLayout3);
        spec3.setIndicator("piero");

//        افزودن تب ها
        tabHost.addTab(spec1);
        tabHost.addTab(spec2);
        tabHost.addTab(spec3);

    }

}
واکنون برنامه شما آمادست.
اسکرول شدن محتوا در تب هاست
به منظور اسکرول شدن کافی است از Scrollview در Linearlayout استفاده نمایید به تزتیب زیر.
                <LinearLayout
                    android:id="@+id/linearLayout3"
                    android:layout_width="match_parent"
                    android:layout_height="match_parent"
                    android:orientation="vertical">

                    <ScrollView
                        android:layout_width="match_parent"
                        android:layout_height="match_parent">
                        <TextView
                            android:layout_width="match_parent"
                            android:layout_height="match_parent"
                            android:text="@string/formul"
                            android:background="@color/menu4"
                            />
                    </ScrollView>
                </LinearLayout>
در واقع کد شما می شود :
<?xml version="1.0" encoding="utf-8"?>
<LinearLayout xmlns:android="http://schemas.android.com/apk/res/android"
    android:orientation="vertical" android:layout_width="match_parent"
    android:layout_height="match_parent"
    android:background="@drawable/listbackground"
    android:weightSum="1"
    android:layoutDirection="rtl"
    >
    <RelativeLayout
        android:layout_width="match_parent"
        android:layout_height="100dp"
        android:background="@color/menu6"

        >
    <TextView
        android:textStyle="bold"
        android:id="@+id/emkanattitle"
        android:layout_width="match_parent"
        android:layout_height="match_parent"
        android:text="@string/formulmenu1"
        android:gravity="center"
        android:textColor="@color/menutext1"
        android:textSize="25dp"
        android:drawableLeft="@drawable/icon7"
        android:paddingLeft="10dp"
        />


    </RelativeLayout>

    <TabHost
        android:layout_width="match_parent"
        android:layout_height="wrap_content"
        android:id="@+id/tabHost"
        android:layout_gravity="center_horizontal"
        android:layout_weight="0.03">

        <LinearLayout
            android:layout_width="match_parent"
            android:layout_height="match_parent"
            android:orientation="vertical">

            <TabWidget
                android:id="@android:id/tabs"
                android:layout_width="match_parent"
                android:layout_height="wrap_content"></TabWidget>

            <FrameLayout
                android:id="@android:id/tabcontent"
                android:layout_width="match_parent"
                android:layout_height="match_parent">

                <LinearLayout
                    android:id="@+id/linearLayout"
                    android:layout_width="match_parent"
                    android:layout_height="match_parent"
                    android:orientation="vertical">
                    <ScrollView
                        android:layout_width="match_parent"
                        android:layout_height="match_parent">
                        <TextView
                            android:layout_width="match_parent"
                            android:layout_height="match_parent"
                            android:text="@string/formul"
                            android:background="@color/menu4"
                            />
                    </ScrollView>


                </LinearLayout>

                <LinearLayout
                    android:id="@+id/linearLayout2"
                    android:layout_width="match_parent"
                    android:layout_height="match_parent"
                    android:orientation="vertical">
                    <ScrollView
                        android:layout_width="match_parent"
                        android:layout_height="match_parent">
                        <TextView
                            android:layout_width="match_parent"
                            android:layout_height="match_parent"
                            android:text="@string/formul"
                            android:background="@color/menu4"
                            />
                    </ScrollView>
                </LinearLayout>

                <LinearLayout
                    android:id="@+id/linearLayout3"
                    android:layout_width="match_parent"
                    android:layout_height="match_parent"
                    android:orientation="vertical">

                    <ScrollView
                        android:layout_width="match_parent"
                        android:layout_height="match_parent">
                        <TextView
                            android:layout_width="match_parent"
                            android:layout_height="match_parent"
                            android:text="@string/formul"
                            android:background="@color/menu4"
                            />
                    </ScrollView>
                </LinearLayout>
             </FrameLayout>
        </LinearLayout>
    </TabHost>


</LinearLayout>
حساس شدن به تاچ در آموزش ساخت تب در اندروید
با این کار ساده جلوه بسیار زیادی به برنامه تان می دهید . کاربر شما با عملیات swip می تواند بین تبها انتقال پیدا کند به طور عامیانه با دست کشیدن رو صفحه تبها عوض می شود.
برای این منظور فقط کافی است کد زیر را اضافه کنید.
//    تغییر در هنگامی که تاچی اتفاق میفتد
    @Override
    public boolean onTouchEvent(MotionEvent touchevent) {
        switch (touchevent.getAction()) {
            // when user first touches the screen to swap
            case MotionEvent.ACTION_DOWN: {
                lastX = touchevent.getX();
//                دریافت آخرین جایگاه تاچ
                break;
            }
            case MotionEvent.ACTION_UP: {
                float currentX = touchevent.getX();

                // if left to right swipe on screen
                if (lastX < currentX) {

                    switchTabs(false);
                }

                // if right to left swipe on screen
                if (lastX > currentX) {
                    switchTabs(true);
                }

                break;
            }
        }
        return false;
    }
//تابع انتقال بین تبها
    public void switchTabs(boolean direction) {
        if (direction) // true = move left
        {
            if (tabHost.getCurrentTab() == 0)
                tabHost.setCurrentTab(tabHost.getTabWidget().getTabCount() - 1);
            else
                tabHost.setCurrentTab(tabHost.getCurrentTab() - 1);
        } else
        // move right
        {
            if (tabHost.getCurrentTab() != (tabHost.getTabWidget()
                    .getTabCount() - 1))
                tabHost.setCurrentTab(tabHost.getCurrentTab() + 1);
            else
                tabHost.setCurrentTab(0);
        }
    }
و در نهایت :
import android.app.Activity;
import android.os.Bundle;
import android.view.MotionEvent;
import android.widget.TabHost;

/**
 * Created by piero on 10/27/16.
 */
public class formul1 extends Activity {

TabHost tabHost;
    float lastX;
    @Override
    protected void onCreate(Bundle savedInstanceState) {
        // TODO Auto-generated method stub
        super.onCreate(savedInstanceState);
        setContentView(R.layout.formule1);

        //معرفی تب هاست
        tabHost = (TabHost) findViewById(R.id.tabHost);
        tabHost.setup();


//افزودن تب ۱
        TabHost.TabSpec spec1=tabHost.newTabSpec("TAB 1");
        spec1.setContent(R.id.linearLayout);
        spec1.setIndicator("Appinapps");

//افزودن تب ۲

        TabHost.TabSpec spec2=tabHost.newTabSpec("TAB 2");
        spec2.setContent(R.id.linearLayout2);
        spec2.setIndicator("google");

//افزودن تب ۳
        TabHost.TabSpec spec3=tabHost.newTabSpec("TAB 3");
        spec3.setContent(R.id.linearLayout3);
        spec3.setIndicator("piero");

//        افزودن تب ها
        tabHost.addTab(spec1);
        tabHost.addTab(spec2);
        tabHost.addTab(spec3);

    }

//    تغییر در هنگامی که تاچی اتفاق میفتد
    @Override
    public boolean onTouchEvent(MotionEvent touchevent) {
        switch (touchevent.getAction()) {
            // when user first touches the screen to swap
            case MotionEvent.ACTION_DOWN: {
                lastX = touchevent.getX();
//                دریافت آخرین جایگاه تاچ
                break;
            }
            case MotionEvent.ACTION_UP: {
                float currentX = touchevent.getX();

                // if left to right swipe on screen
                if (lastX < currentX) {

                    switchTabs(false);
                }

                // if right to left swipe on screen
                if (lastX > currentX) {
                    switchTabs(true);
                }

                break;
            }
        }
        return false;
    }
//تابع انتقال بین تبها
    public void switchTabs(boolean direction) {
        if (direction) // true = move left
        {
            if (tabHost.getCurrentTab() == 0)
                tabHost.setCurrentTab(tabHost.getTabWidget().getTabCount() - 1);
            else
                tabHost.setCurrentTab(tabHost.getCurrentTab() - 1);
        } else
        // move right
        {
            if (tabHost.getCurrentTab() != (tabHost.getTabWidget()
                    .getTabCount() - 1))
                tabHost.setCurrentTab(tabHost.getCurrentTab() + 1);
            else
                tabHost.setCurrentTab(0);
        }
    }
}
آموزش ساخت تب در اندروید